Monday, August 27, 2012

8 Steps to Engineer Your 'Classroom Brand'

At the start of the school year, I had plenty of motivation for creating a classroom brand, but had to devise how I would implement my classroom brand in my physics classes and determine what it would require to get students to buy in to the brand. The classroom brand had already been chosen, TeamPhysics, but without much of a background in marketing, implementing the brand was a challenge. So, I looked at all that I knew of successful branding campaigns and put pieces together from each to form the elements of my classroom brand.


It required several steps to really engineer the brand to start. From what I learned about branding my classroom, here's what is important to do in order to get started:
  • Write your classroom experience sentence - 
I thought of Dan Pink's 'What's Your Sentence?' presentation on this. He challenges people to define their life's accomplishments (what they want to be remembered for) in a single sentence. I realized, after thinking about this, that most brands keep it simple, like Nike's Just Do It. So, I needed a sentence for my classroom. The sentence needed to answer the question: what do I want my classroom to be known for after students leave? Once I had this sentence, then I could go forward with the rest of the branding. After all, isn't it the most important thing to know what a brand stands for?
  • Design a logo for your classroom brand -
Every good brand needs a logo. The visual recognition alone is imperative to the branding concept. When I thought of a brand, there were really two choices: an icon logo or a word logo. For TeamPhysics, it seemed sufficient to use the word as the logo (like Google does.) To make it stand out and be unique, I thought I would craft the word TeamPhysics out of physics symbols.
  • Come up with a hashtag for your classroom brand -
If you're not using Twitter in your classroom, then this step does not yet apply to you; however, if Twitter is part of your educator world, then you need a hashtag for students to come together about your brand and about your classroom on Twitter. Research your ideas before making it official. Sometimes, hashtags have more than one meaning or acronyms have significance in a foreign language, and you don't want overlap or muddled conversations on Twitter. We went with #TeamPhysics, but over time this was used by people around the world who weren't associated with my class; so, next year I will choose something different. Perhaps an acronym with a year (e.g., tmphys12) can be your hashtag. Remember that social media can help extend the classroom experience beyond the four walls of your room.
  • You need a mantra for your classroom brand -
Think of the short sub-sentences that companies have underneath their logo. Tumblr has a good one: "follow the world's creators." This is something that students can remember and recite to others about your classroom brand. It helps build that abstract element of what the brand stands for. The TeamPhysics mantra is "Challenge accepted."
  • Your classroom brand should embody student-developed norms and values -
Not at all to be confused with classroom rules, norms and values are ideals that students seek to have in their classroom community. Develop these together in the first days of the school year and then promulgate them. A good example of a norm from TeamPhysics refers to what happens after whiteboard presentations or students volunteer. The norm is: everyone claps, and it's a golf clap. These are those behaviors that everyone wants to have going on but don't come from rules. Much like tipping a server at a restaurant is a norm, not a rule.
  • Classroom brand paraphernalia -
Start planning early to find out who your school or athletic department uses to get t-shirts made. Have students participate in the design of the shirts, choose colors, etc. Get them made as early as possible in the year. Encourage everyone to get one, and, if you can, find grant money, booster club or parent club support, to get everyone a shirt. You can have special days where students where their shirts, like test days (like game day support for a team.) It helps to promote the classroom brand and unify the group.
  •  Make your classroom brand ubiquitous to students -
Any handout, assignment, or assessment that students receive from you should have your classroom brand logo on it somewhere. Whenever you (or your students) talk about your class, make sure everyone is passing the pronoun test: do statements about the class contain "we" language or not? Classroom culture is not about teacher vs. students; it's about us together. Focus the language used in this way. Stop referring to your class by its course catalog name and start referring to it by classroom brand. Students don't "take physics with Mr. Abud" they are "a member of TeamPhysics." And, when we had our cardboard boat races in the spring, the programs all had "Presented by TeamPhysics" with our logo. It's really the little things that make it work.
  • Obtain survey-based feedback on your classroom brand from students from time to time -
Just like corporate brands obtain feedback from consumers to see how their brand is doing, it is important that students get feedback opportunities that are risk-free where they can share ideas for making the classroom even better. Anonymous surveys, class discussions, small group discussions and whiteboard presentations are all possibilities for obtaining this information.

TeamPhysics was one of the best ideas I have ever had for building classroom culture and establishing the learning climate I wanted to foster in my students. It fits with the way that I teach science and my philosophy of education. It gives the students something to be a part of and not merely feel they are just in another class. This can be really helpful when the going gets tough. Since physics is taught using the Modeling Method we are doing a tremendous amount of student-centered activity in groups as well as project-based learning. The atmosphere of the classroom is that of a team, and needs to be just that, in order for Modeling Instruction to work. Modeling Instruction doesn't work if you don't build rapport and the fastest way to building rapport is to promote a positive classroom culture.

The students really came together around the classroom brand and talked it up so much and so regularly that it did become something bigger than I alone could ever have made it. The principal would comment to me about how he noticed students regularly Tweeting about physics using the hashtag #TeamPhysics and that they seemed to be genuinely interested in the notion of 'physics as sport.' It was rarely homework to Tweet about physics. Instead, we would have #TweetYour______ Twitter activities during class, where students would share pictures of their labs, whiteboards, or even just their data. Also, we held class discussions, much like #scichat, on Twitter during class and played Kelly O'Shea's whiteboard mistake game using Twitter as well (#WhatsUpWithThatBoard.) Students outside of class would post comments or questions about homework, share photos of projects in the works, or just share links to physics related stuff they saw outside of school or online. When the students started sharing on their own volition about physics with the #TeamPhysics hashtag, I felt I had accomplished something with the classroom brand.

To round out our classroom culture, we had character building activities during the year, opportunities for community service, and celebrations of accomplishment.

The Rock, Paper, Scissors tournament is a good example. This single elimination challenge of the classic game has the winners of each round taking the losers with them to the next round as their cheering squad. This is the "biggest fan" stipulation. If you lose, you become the winner's biggest fan and cheer them on. By the finals, the class is divided in half shouting and cheering on one or the other student. There are plenty of character-building team-building activities out there. They take only a few minutes and can make the difference in sculpting your classroom culture from time to time.

In December, we adopt a local family whose name has been submitted as needing assistance for Christmas. The class divides up into groups and organizes purchasing gifts and food for the entire family for Christmas. Then, they have a wrapping party one day (complete with hot chocolate and donuts) and then choose a few students to personally deliver the gifts to the family. This is always a memorable opportunity for students and makes the class seem to be more than just 'learning physics.'

Donut holes or popcorn parties are easy to do, and they go well with activities in class. For example, if you have presentations coming up after a big project, get a bunch of popcorn for everyone to share and eat while they observe the presentations. Putting this extra tidbit into your classroom activities can make 'scary presentation time' into a celebration of accomplishment.

When it all comes down to it, there are so many activities and elements of the TeamPhysics classroom that stem from the classroom branding idea. For me, the classroom brand had to entail a sense of team, foster student-student and teacher-student rapport, help extend learning beyond the school day, and be something with which students could identify. Capitalizing on the popularity of the #Team________ concept on Twitter, and leveraging the power of branding, helped to create the classroom culture that I always wanted. The reason I believe it was successful now, looking back, is that everything I wanted my classroom to stand for was all represented in one centralized abstract thing, the classroom brand. Once your classroom brand takes off, other students and colleagues will start to take note. It will bring positive attention to your students and their classroom, which will reinforce the greatness of that classroom culture.


Creating Your Classroom Brand: The Story of #TEAMPHYSICS

This is a story about classroom culture. It includes an introduction to, what I suspect is, a novel concept--that of the classroom brand. It is something that integrates marketing, psychology, and education. I suspect that this has been out there but not well defined as of yet. My hope is to shed some light on what I refer to as the classroom brand and explain how I applied this concept to my own classes to create the classroom culture I was trying to foster in my students. The story I am about to tell is in two parts. The first part is the background and motivation for why I chose to brand my classroom, and the second is the story of my first year with a classroom brand.

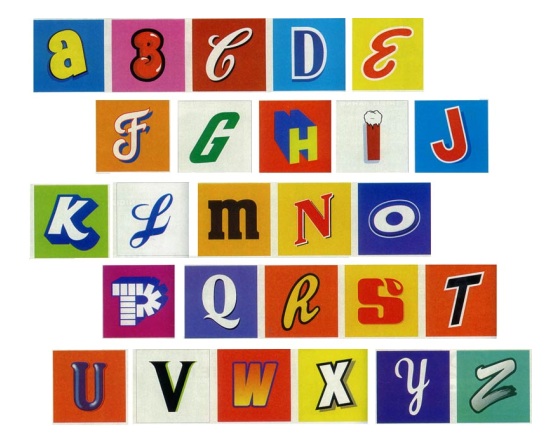
The alphabet constructed out of popular brands.
I would like to begin by disclosing that I am no researched expert on marketing nor the psychology of advertising, and so the thoughts here are my own. I have not seen in the literature nor in any personal blog or news article anything that describes what I call the classroom brand, but that does not mean I am the first to note this. Much has been written about brands in the classroom, but nothing about an actual classroom brand. Based on my own background in education, philosophy and cognitive psychology, I have compiled years of personal observation to examine how we are hard-wired to accept brands and branding based on the way in which our brains form associations. Once upon a time, someone pointed me to the brand alphabet to illustrate how associations were vital in learning. The alphabet has now gone through several branding iterations since the original (shown above) was created. You can even test yourself to see how many you would get, which should make the argument for the power of branding pretty compelling.

Perhaps what I point out here will seem obvious to you; but at the least, I hope that it seems a logical generalization about the nature of how we think as consumers which follows from your own experiential evidence. Finally, I hope that you can get a sense of what branding can do for a classroom, especially at the secondary level, because the age group responds so well to branding campaigns in general.

The power of the brand has been well known in the business world for years; however, looking around at other areas of life, you will likely find that branding has spread beyond a mere marketing tactic in business to almost all aspects of culture. Brand recognition part of our cultural upbringing and it takes a hold on everyone, whether subconscious or not. Everyone gets exposure to certain products, games, services, and entertainment throughout their lives. They come to know, like, and dislike certain brands based on their experiences. As we mature, we begin not only to recognize brands, or to simply be aware of them, but we identify with them, or against them.

The pervasiveness of brands in culture can be seen in all countries and with all age groups. a survey of school children and college students from a couple of years ago describes top brand recognition. Though this article describes that teachers should take advantage of brands in their classroom, the context is different than what I am referring to here. Where this author suggests to use brands that students recognize in the classroom, such as Google or Microsoft, I am proposing that you create your own classroom brand--a brand that represents what your classroom stands for and the type of "product" you sell as an educator.
  • Part 1: Motivation for a classroom brand - arguments for the power of branding
Few could argue that children are drawn to logos and products based on colors, shapes, or appealing design. Regardless of the type of product or the quality of it, children can recognize and even choose brands simply based on the visual it gives. Watch a parent with a small child in the grocery store checkout lane to see this for yourself. It's no accident that certain impulse shopping items, toys, and candy are all placed there. In adolescence, people become more aware of social branding. The products associated with fashion, style, class, and money start to work on the minds of kids in middle school. This motivates them to buy certain products to communicate a certain image to other people. Even the image that they choose to communicate has been branded and "sold" to adolescents--e.g., the skinny girl who wears a lot of makeup, or the male jock. The film Miss Representation does an excellent job of illustrating the influence of branding on young girls in the long-lasting implications. Of course, some would call these image brands a "stereotype," but in the way that they are being pushed to consumers, they are an actual identifiable product themselves, and thus they are a brand. Everything from food, to entertainment, to personal image is branded for school-aged children to experience. Brands are ubiquitous, and a recent mobile app game called Logos quiz very clearly points out this fact. In this game, you are given a set of logos for brands and try to guess the name of the brand based only on visual recognition. It was a very popular game with the high school students in my physics class this past year.

The experiences we have with brands as children and young adults then shape our brand associations and choices for the rest of our lives. To some degree, the extent to which we consume brands helps design and shape our self image, beliefs, perceptions, and personality. As adults, we are exposed to more abstract branding campaigns than those to which children are exposed. The brands start to come more in the form of beliefs and choices. An election year is a prime opportunity for one to see this at work. The President has initiated a campaign of 'forward' for 2012, in contrast to the 'change we need' that was behind his 2008 election. On the challenger's side, Mitt Romney's team has launched a 'believe in America' campaign. Both candidates for president hope to compel voters to identify with them, but each has chosen to do so through branding and brand recognition. But this isn't the first time we have seen this sort of thing. Political campaigns have chosen to use branding for as long as they have been documented. Some simply refer to their "slogans" or "image," but these, I argue, are just iterations of branding.

The branding that takes place in political campaigns is one form of what is referred to as personal branding, which some might learn about in marketing school, but this is a form of branding where a brand that represents and stands for an individual is created that becomes bigger than the mere person alone. If you're unfamiliar with personal branding, you can immediately recognize personal branding if you think of a famous musical act, e.g., the Beatles, or Bob Marley. The Beatles are more than just their music, the musicians, or a logo. The Beatles is the brand that arose from the band. The same is true with Bob Marley--and if you consider politicians in the same way, the brand of Barack Obama or Mitt Romney overshadows the individuals themselves.


From childhood to adulthood, branding is a pervasive aspect of our lives. Branding even supersedes the cultural, business, or individual level. Having just finished the 2012 London Games, you might recall plenty of Olympic branding going on--"world togetherness, in sport."


Associated with this type of branding of an event is location-based branding, such as that which happens with cities, states, and countries. Branding campaigns such as "I love NY" and "Pure Michigan" illustrate how locations want to sell themselves as their own brand. Perhaps the most noteworthy location-based branding you are familiar with is that of branding a country. When you see a country's flag, you are seeing its logo--it's brand. And that brand represents all that country embodies. We see the pride associated with the branding of a nation during times of war, tragedy, crisis, or unity. In the U.S., the flag so embodies our country's brand that people put flag stickers on their vehicles, buy U.S. flag clothing, or tint their windows and paint their cars with the stars and stripes. It's not just patriotism; it's branding.


Perhaps the most well-known branding is that associated with sports teams and even individual players. In sports entertainment, branding has had as much, if not more, success than the branding in any other area. From team logos, to players' numbers, to school colors, branding has helped to market and promote sports entities and institutions to the masses. There isn't anything bad about branding, it's just pervasive in the world. Sports is simply a prime example, from school-based athletics to professional leagues, sports team and player brands dominate.

Don't believe it? Take a guess what the first result will be when you do a Google search for "Jordan."
Yea, it says "brand" too...

  • Addendum to Part 1: Inspiration from the social web
The success of branding in so many areas of life, especially business and entertainment marketing, shows, at least on the outside, the power that brands can have in representing a product, person, organization, event, location, or even a belief system. But since the dawn of social media and the social web, a new type of branding has arisen on the Internet and it has inspired a new approach to branding in other areas. This type of branding, for lack of a proper term, is an experiential brand. It is the type of brand that Facebook, Twitter, Tumblr, and Flickr all seek to create--one that is based on a shared experience and a type of social connectedness.

When you think of what the Nike brand has done in their campaigns, they've gone from representing products to representing what can be done with those products. When it boils down to it though, Nike is still trying to sell a physical product. Now, contrast that with something like Facebook and what they are (were) trying to 'sell.' It wasn't a physical product, like Nike, but rather theirs is the experience of having (potentially) all the people you know in the same space to interact with while simultaneously documenting/chronicling your own life. This is very different from selling a product. Certainly, Facebook has its critics, myself included, who 'dislike' some aspects of what Facebook has become, but you cannot argue that it is a brand that represents experience. The same is true of other social media companies out there. The sense of community that one gains from Facebook is the appeal; no matter what someone tells you, they didn't join to play Farmville.

It's because of things like Farmville that I left Facebook a few years ago. The community became too cluttered and lost sight of its original purpose. When it became too cumbersome to navigate Facebook for the sense of connectedness I sought with my family and friends, I knew it was time to abandon ship. So, I joined Twitter in 2009 and never looked back. Twitter seemed minimalistic enough to accomplish what I wanted out of a social networking sight--conversation with others and a sense of connectedness based on common interest. The more I learned on Twitter, the more I learned about Twitter...and the more I liked it. I quickly reached the highest level of Twitter usage and decided it was time to start using it in my teaching with students and colleagues. That's when I learned something that was a game-changer for the way I thought of branding.

For the longest time, it seemed that you needed to have a big company, big idea, or simply have status worthy of devising a brand; however, on Twitter, anyone and everyone could create and market their own brand. This was ostensibly true to me, as was the nature of the potential for brand creation on twitter, when I saw the hashtag #TeamFollowBack from one of my students in a tweet and then another in someone's profile. I didn't understand the terminology and had to ask a student to explain it to me: "It's just people who will follow you back," one physics student told me. Apparently, they didn't actually 'join' this team, they just identified with it and as they were being part of it through following the common tenet of "you follow me and I'll follow you back."

The more I looked into it, the more I began to notice #team__________ on Twitter. People create a hashtag for something they believe in, identify with, or want to promote and make a 'team' out of it that people can 'join' and feel a part of. There's everything from #TeamJesus to #TeamSingle out there. So, this begged the question: could there be a #teamphysics? The more I thought about the possibility of a hashtag #TeamPhysics, the more I realized that it had to stand for something, it would have to be a brand of the experiential sort, but what would that even look like?

After mulling it over enough, I had the idea to brand my classroom #TeamPhysics. I proposed the idea to my colleague @mr_pata at our first staff meeting. "I think we should brand our classroom #TeamPhysics, because we really 'sell' a unique version of physics," I said at our department table group. Not a minute went by and the principal walked over to our science teacher table and said, "Good morning team science!" passed out some papers and moved on. We looked at each other, nodded, and realized it was a must do idea to brand the physics classroom. Between the power of brand awareness, social connectedness associated with brands, and the relevance of the #teamBRAND that is now all over Twitter, it made perfect sense to implement #TeamPhysics for the year--and that's just what I did.
  • Part 2: What's a classroom brand?
When I think of a product brand, as described and illustrated above, I think about all the products, ideas, and experiences that are associated with that brand. Nike, Just Do It, is a way of thinking as much as it is a pair of shoes or the feeling of accomplishment associated with sports performance.

When I think of how I would define a classroom brand, it doesn't look much different. A classroom brand is that which represents all that your classroom stands for--the ideas, experiences, norms, values, interactions, structure, and connectedness. For me, a classroom brand simply embodies what I want my classroom culture to be. That's why TeamPhysics was the perfect brand for my classroom. TeamPhysics is more than a mere moniker; it's more than a group; it's more than a logo; it's more than a hashtag. All of those things are necessary parts of it, but the essence of TeamPhysics is more than just the sum of its parts.

The motivation to create a classroom brand was compelling and from many sources, but the steps to implement a classroom brand were less clear. After lots of planning, I outlined 8 fundamental steps that were necessary for me to put the classroom brand idea into action. From children's cereal to university athletics to political campaigns, branding is a powerful mechanism for bringing people together and communicating. Branding and brand recognition has a strong appeal to people because it helps them to easily form associations between ideas, experiences, and products to a brand. It makes perfect sense to leverage this in the classroom and bring about a classroom brand to help students form the associations necessary for successful experience in a class.

BRAND YOUR CLASSROOM


Thursday, August 16, 2012

#ModChem Day 15

Modeler's Log, Day 15--

"I'm so sad to see #ModChem12 end!"
Way back on day 1, some of us had no knowledge of what Modeling Instruction even was, while others had previously completed workshops in physics and thought we knew what to expect here in the chemistry workshop. Here we are now--three weeks from where we started; 15 days of instruction and nine full units of chemistry models later. After completing the Modeling Chemistry Institute at Mansfield University, made possible by Corning Inc., I can confidently say that all of the participants have left better teachers than we came. Everyone came away with something meaningful; it's sad to see the workshop come to a close. 

This last workshop day did not include any new content, because we finished the last of the nine units on day 14. Though everyone would have loved to get into more chemistry content, today was about tying up loose ends and reflecting on the workshop. The conclusion of the workshop started by activating our American Modeling Teachers Association and getting a brief tour of the website. We subsequently moved on to one final questioning simulation, and then we put the whiteboards away for the last time.

Our final whiteboarding practice session include more practice with the different stoichiometry applications from unit 9. Everyone acknowledge how much more comfortable we felt with the whiteboarding process at this point. We were now able to give some helpful feedback even about the process itself. The subtleties of whiteboard questioning were now within perspective. From this last session, we noted that it is important to ask open-ended questions, not just open-spaced questions. We found this subtle difference in how we viewed leading questions. What we thought were leading students to discuss an idea more were actually just leading them to a single answer via fill-in-blank questions from the teacher, e.g., "The quantity that helps us to relate the number of grams to the number of moles of a substance is ________?" This doesn't work very well. Instead, consider a more constructed response prompt: "How do we relate the how much to the how many for a substance?" The other two important points from our feedback pertained to allowing proper 'wait time' for student responses before following up and cautioning teachers about answering their own questions. Neither of these practices foster good whiteboard discussions.

Next, we cleaned off the whiteboards and tidied up the lab for the last time in this workshop and it was time to take our post-test of the Assessment of Basic Chemistry Concepts (ABCC). After looking at the questions on the ABCC for a second time after learning all the models in each unit, I have a much better sense of how my own thinking about matter and energy have changed. This assessment should be given as early in the year as possible, especially before you begin teaching the content of the modeling chemistry units, to students. The objective here is not for the assessment to be part of students' grade in the course but to yield a measurement of how much they learned over the course of the term and how well the instruction succeeded in steering students to correct lines of thinking. My experience in modeling physics using the Force Concept Inventory (FCI), as well as discussion of the chemistry concepts inventory, has helped me foresee how the ABCC will work into my chemistry teaching. At the end of the first week of school, I will give the assessment to students, it will be scored to see what their preconceptions are, but the grade will not be counted. 

Then, after we have finished all nine units in the curriculum, students will again take the assessment (not to be counted into their grade) and the results compared to their first attempt. The difference between the pre-test and post-test scores on the concept inventory can help see student gains in learning, e.g., if a student scores 15/27 on pre-test and 21/27 on post-test. To dive deeper into the data, a "percent yield" of sorts can be determined for each student. This is where you take a student's actual score change compared to their possible score change. Starting with a pre-test score, say 15/27 questions answered correctly, generate a 'potential gain' as the difference from highest possible score--in this case, a 12 question difference. Then, upon completing the post-test, say the student scored 21/27. You can determine that their 'actual gain' was 6 out of a possible 12 potentially, or 50% score change "yield." This more in-depth examination of scores keeps the playing field level. It compares students to themselves instead of to each other. This way two students who each had a 3-question improvement can be compared. For example, let's say that one student scored a 4/27 on the pre-test and had a 3-question improvement while the other scored 24/27 on pre-test and had a 3-question improvement. With just the change in score, the comparison would be meaningless, but with a comparison to what each student could have scored, the 3-question improvement becomes much more telling.

After we finished with the ABCC, it was time to do course evaluations, which interestingly had two components: 1) rating the quality of the workshop itself; and, 2) rating your pedagogical content knowledge in a variety of categories before and after the workshop. The latter of these two components really encouraged you to reflect on what you learned in the workshop and how it will influence your teaching. It had questions asking you to rate the frequency with which you used a variety of teaching techniques, e.g., student-designed experiments, textbook reading & problem sets, discussions, lectures, etc. both before and after the workshop. This way of surveying teachers could really help a person to realize just how much their teaching has been impacted by this workshop.

After I finished my survey, there were a few minutes until the rest of the group was done; so, I did some reflecting about my own teaching practice and how this workshop has influenced what I will do in the future. I thought about the big take-aways from #modchem2012. For each participant, this list might be different, but for me, the following are my top five hallmarks of the workshop:
  • Modeling instruction is the coolest and most comprehensive student-centered pedagogy in science
I've always been a proponent of helping students to discover (or rediscover) things for themselves in a class. What fun is there in just telling them when they can be put in a situation to draw their own conclusions? I was unsure prior to this workshop of how this could be done with chemistry concepts. I was pleasantly surprised to see that everything from atomic particles to stoichiometry to thermochemistry to the gas laws could be developed with students without having to resort to telling.
  • Teaching energy through storage and transfer representations (see day 6)
The treatment of energy in modeling instruction is somewhat uniform across the disciplines. It is heavily influenced by Gregg Swackhamer's Cognitive Resources for Understanding Energy. It was very nice to see how the energy associated with chemical reactions, temperature shifts, and phase changes was treated together. This kept energy connected to matter, as it should be, and made the relationships between physical and chemical changes easy to explain in terms of energy.
  • Focus on process, not just answers
All too often, the study of chemistry is reduced to problem-answer situations, mostly of the quantitative nature; thus, chemistry class often looks to students like math class--fragmented, based on calculations, and all about the answers. Though calculations are involved, and though math is a tool to be used in chemistry, this is far from the whole story. In treating chemistry teaching and learning like math class, and in focusing so much on the answers, students can lose sight of the overarching concepts, themes, and physical context of chemistry. Modeling instruction seeks to shift the paradigm from answer-focused to process-oriented teaching and learning. The belief is that with a focus on the process, the answers will naturally come; in contrast, however, when the focus is on the answers, the process is obscured. 
  • Sequence in the chemistry curriculum follows a historical timeline
Most chemistry textbooks, and even more chemistry curricula, will treat the historical timeline of chemistry and the development of the model of the atom in a single unit or chapter. It is typically taught, if at all, as a set of bullet points on a timeline with little emphasis on its importance to the study of chemistry. After the respects are (briefly) paid to the chemists who have gone before, attention turns to concluding the whole of chemistry based not on empirical evidence but on rote fact. The sequence of the units in the modeling curriculum framework honors the historical development, not simply out of reverence, because it yields an empirical context for the understanding of chemical concepts.
  • Discrepant events
I love using discrepant events in my physics classes, and the Motivational Power of Discrepant Events has been chronicled in many disciplines, but it wasn't clear how I would be able to use this powerful teaching technique in chemistry. We saw several in the workshop, and there are plenty of resources for them out on the Internet. If you want to find out about discrepant events in chemistry, you can get some inspiration from Steve Spangler and some other ideas are available in the resources of this inquiry-based chemistry page. Ultimately, discrepant events only hold power if they are student-centered and allow pupils to engage with the event in their own personal way so as to reflect on their preconceptions. The conceptual change model is very explicit about students exposing and confronting their beliefs.
There once was a master at discrepant event teaching in science, and he had a television show. Don Herbert, a.k.a. Mr. Wizard, had perhaps the most well-known reputation for science in the 20th century. Mr. Wizard does a classic discrepant event with water volume that could fit into any chemistry course, and it of course is available on YouTube. Now, keep in mind that whoever posted this video on YouTube decided to do a little model deployment of their own with Mr. Wizard's lesson, applying the concept to polar ice caps melting, but feel free to appreciate the clip for its originally intended purpose. For your viewing pleasure, here it is:


Looking back on the workshop, it took some time for everyone to find their groove with the content and pedagogy; but in the end, everyone seemed to have caught on to what Modeling Instruction is trying to accomplish with chemistry. All of our questions were answered and finally, we can say, "now, we get it!"

Thursday, August 9, 2012

#ModChem Day 14

Modeler's Log, Day 14--

Today is penultimate day of the 2012 #ModChem workshop, but we are not slated to start our cool down at all. From the rich conversation stemmed by Carl Wenning's musings on inquiry instruction to finishing up the last units of the modeling curriculum framework, today was large.

Our last article discussion was today, and it featured Carl Wenning's work on resistance to inquiry-oriented (modeling) instruction. This is a must read for those beginning with modeling instruction in their classrooms, especially those first introducing it at their school or district. Most everyone new to modeling instruction, or any methodological approach of student-centered teaching, has anticipations or apprehensions about implementing it in their classrooms for the first time. This article characterizes some of the more common aspects of resistance that teachers will encounter from students, parents, administrators, and even educator colleagues. Wenning also discusses some features of how inquiry-based instruction can and should be interpreted, but meanwhile stresses the importance of the classroom climate setting in communicating the intended perception of an inquiry-oriented classroom.

Some of us in the workshop have previous experience with modeling instruction in physics, POGIL, or some other type of inquiry-based instruction, which makes us more comfortable moving modeling chemistry into our classrooms; however, those who are coming into modeling instruction in chemistry from a more traditional background emphasized concerned feelings and anticipations for the coming year about implementing modeling instruction. Reading what Wenning had documented was a realistic projection of what teachers can expect with introducing modeling instruction into their science classroom. Our conversation about the article focused on three key ideas: what sorts of resistance to expect, how to deal with that resistance, and how to create the optimal classroom climate for a successful inquiry-based experience.

Aside from resistance to the instructional approach, other general concerns from teachers included:
  • How best to create a safe and inviting environment for participation and intellectual risk-taking
  • Dealing with absences in a classroom where being present is EVERYTHING
  • Sequencing concerns in comparisons to other teachers' classes or curriculum maps
  • Common assessments and high-stakes state tests; teacher evaluation data
  • First day of school activities to help set the classroom climate
There are, perhaps fortunately, no definitive ways to ease all of the above mentioned concerns. Many of these concerns are manifestations of philosophical views, paradigm stagnation, and general 'fear of the unknown.' Still, whether stemming from externally exerted forces or self-created, these concerns are genuine. Ultimately, it boils down to the educational philosophy of the classroom teacher and the school paradigm for teaching and learning. Here are questions to ask yourself, which can help identify your philosophy to address these kinds of concerns when considering inquiry-oriented instruction:
  • Who is the educated person?
  • What is good teaching?
  • What is learning?
  • What knowledge or skill is worth knowing?
  • What is the ultimate goal of your classroom for all students?
The remainder of our discourse focused on first day and first week activities to foster the environment in your classroom necessary for successful modeling instruction. No matter what you choose to do to introduce your class to students in the first days of the school year, it is critical that you make explicit the type of climate and environment that will be essential to the inquiry-oriented instructional style students will experience.

My personal take on how to reveal to students how they will be learning in my modeling classroom is a series of activities that span the first week of school. Dedicated content exploration doesn't officially begin until week 2 in my classroom. I view modeling instruction science class like a sport, and my students as a team, which is why it is so important for me to invest in team building in the first days of school. Perhaps the most well-known team-building exercise is the Marshmallow Challenge by Tom Wujec. It really is a perfect example, in my estimation, of how learning will feel to students in a modeling classroom. Since it is a very positive experience for most, and a very telling example of focusing on process instead of product, this activity is an essential introduction to my class.

Other ideas for team building activities will be discussed in more detail in a separate dedicated post.

Now, on to the concluding content of the modeling chemistry workshop!!

Unit 8 finished with a more detailed investigation of using the BCA table method for limiting reactant and percent yield stoichiometry problems. The BCA approach make these typically more challenging problem types more manageable to students and set them up for confidence in their problem solving strategy in stoichiometry labs and context-rich problems. Based on the use of the balanced chemical equation to yield "for every" statements about the relationship between required moles of reactants, students can readily determine the limiting reactant in a reaction process and proceed to predict a theoretical yield of product based on that amount. Again, the BCA approach empowers students to think through a stoichiometry problem and not merely solve it blindly using algorithms.


For the first time in the workshop, and to bring unit 8 to a close, we looked at and discussed the unit 8 assessment to scrutinize the types of questions asked and the setup of the assessments themselves in the modeling materials. This sparked a larger discussion about assessment and grading in general, specifically how assessments would look with modeling instruction compared to what we've done with assessments previously in our classrooms. Main features of the comparisons included that assessments in modeling instruction are: skill-based, shorter, mainly constructed response, and focused more on conceptual understanding. Some teachers find this manner of assessment to be vastly different than what they are used to with longer multiple choice tests. Ultimately, modeling instruction has clearly defined skill-based learning goals for students, e.g., standards, and the assessments match those standards precisely. When we really looked at the materials more closely, we realized that everything from labs to homework to assessments coherently centers around the standards. This makes perfect sense to keep things consistent and focused on learning. The next step was how to grade in a course like this: points-based or standards-based? Students will logically seek to reflect on grading practices, too, once they encounter a teaching and learning system that doesn't seem to match up with points. We won't get into grading too much more here, but I will say it poured over into dinner conversation with everyone later on after the workshop day ended. It is something everyone must rethink when they change their teaching practices. There's so much to grading and assessment that I have personally altered in my classroom since committing to modeling instruction that it will require its own post, if not posts, to explain!

After lunch, it was on to unit 9 - applications and extensions of stoichiometry - where we will conclude our modeling chemistry curriculum.  The last unit in our sequence sounds like it's focused exclusively on stoichiometry, but it is actually around stoichiometry. The topics of study in this unit include partial pressures and mole fraction, molar volume and the ideal gas law, molar concentration and solution chemistry, and heat of combustion and thermochemistry. Each of these topics has the potential to be its own unit, but they are all introduced together here with the central theme of ways of "finding moles." Since students are now facile with BCA tables, providing multiple ways to determine moles in various settings or process can create the context to make advanced introductory chemistry topics more accessible. It is during or following unit 9 where the curriculum can branch off into other extensions of stoichiometry, such as acid-base, kinetics, equilibrium, or electrochemistry. We whiteboarded questions from homework assignments in each of these topic areas to practice our questioning and discussion skills one last time. 

**SPECIAL NOTE** 
Some of these photos contain whiteboards with deliberately embedded mistakes.
  • Dalton's Law of Partial Pressures & Ideal Gas Law - keeping with the PTVn table method of unit 2, we introduced the gas constant, "R," and the ideal gas law. Particle diagrams to represent what was happening were kept an essential part of problem solving considerations here as well. In this topic, we did a molar volume of gas lab to determine the 22.4L/mol relationship.
     
    • Heat of Combustion & Thermochemistry - treating energy as a reactant or product to include in the balanced chemical reaction, we were able to use stoichiometry approaches to relate moles to energy transferred during endothermic and exothermic reactions. In this topic, we did a calorimetry lab to find out exactly how much energy was associated with the combustion of one mole of a substance. 

      • Molar Concentration of Solutions - keeping the focus around moles, the BCA tables and solution volume can be easily connected to make molarity accessible to students. Here you can see that a pictorial representation, using rectangular areas with length=volume & width=moles, for molarity creates a visual cue for thinking about solutions or dilutions.


       Two of the biggest take-home messages of the entire workshop, which have been creeping up all along, finally manifested themselves during units 8 and 9:

      Take-Home Messages:
      1) Many first year chemistry course quantitative topics are applications of stoichiometry, treat them in terms of being advanced methods of determining moles for the purpose of doing stoichiometry. For example, thermochemistry topics relate energy transfers to moles; acid-base relates pH to moles; electrochemistry relates electron transfers to moles. If students can make the connections between skills they already have learned with stoichiometry to other topics, then those otherwise nebulous second-semester topics can be more easily assimilated into students' conceptual understanding. This approach of treating advanced topics as applications of stoichiometry demystifies the calculations and helps students to organize their learning around those topics.

      2) Energy is not a stand-alone unit in chemistry and shouldn't be treated in isolation from other topics or ideas. This is one area where the modeling chemistry approach shines. Energy is not just something learned about in one, or maybe two, topic studies in a chemistry course; rather, the treatment of energy is done in the context of almost all other topics. This helps students to keep a coherent view of energy in chemical processes and have the ability to quantify energy more readily if they can conceptualize its physical role in a system. This becomes another powerful skill students can rely upon when encountering new topics. When they consider the energy flow in a system, they immediately can find something familiar with which to connect new phenomena. Regardless of how one chooses to view chemistry teaching, the view of the material world is typically one of matter and energy. So, shouldn't energy be kept at the forefront of a study of most chemistry topics?

      Tuesday, July 31, 2012

      #ModChem Day 13

      Modeler's Log, Day 13--

      Today, the initial challenge was to create story boards that summarized the model development so far in each unit. The boards were to summarize the model with diagrams, pictures, graphs, but no word explanations. Essentially, a summary in pictures. We did this for units 4-7. Each group took a unit and summarized in on a board and then we presented them to the class to make sure we had a sense of the model development sequence. Kind of like a, "view from 20,000ft.," the model summary boards keep you grounded in the big picture of what's going on in the curriculum.


      Since we didn't have an article to discuss today, our summary boards led us into a discussion that was philosophical in nature anyway. We discussed whiteboarding in our classrooms and how, if the students bought in to whiteboarding as we have in the workshop, students would be very self-directed in their whiteboarding practice in class. Whiteboards can even be a sub-plan after a class becomes facile with the technique. Students regularly have to whiteboard their homework and present to each other when the teacher is there, why stop this practice if there is a substitute teacher? It was suggested that you could simply leave an answer key to the homework with the sub for students' reference. A student could get to play the role of the teacher (class might vote to decide who will impersonate the teacher) and have them take photos of their boards and send to you (on email, twitter, or Google+) just for record. At some point during the year, students will take a more active role in questioning during whiteboard sessions, and they will be able to run a whiteboarding session to go over homework on their own without much, if any, prompting. This is an ultimate goal, to empower the students to be metacognitive enough that they can self-analyze and regulate their own examination of homework solutions and problem-solving strategies.

      Next, it was on to unit 8. This was a dive into the deep end with stoichiometry. We introduced a teaching approach for stoichiometry that is known as the BCA Table. This method is a cognitive approach to tackling stoichiometry problems that will keep students grounded in the balanced equation and what is physically taking place in the reaction. The BCA Table approach is summarized in the following presentation, which is adapted from its original form, by Larry Dukerich:


      The unit 8 paradigm lab experiment for unit 8 places a copper wire into a silver nitrate solution. This was another multi-day wet lab, the first being the iron nail lab from day 11, where it's necessary to allow the reaction some time over more than one class period to proceed. Connecting this lab to previously learned content, models, and skills consists of having students writing the balanced equation for the reaction and predicting the products based on a model for this type of reaction. As it turns out, students will write two possible reactions that could take place, based on the possible ions of copper that could be present in solution. This leads students to inquire how they might determine which reaction actually takes place. Again, as with the the iron nail lab from day 11, students will be able to determine which reaction took place empirically based on the molar ratio of solid products and reactants in their experiment. It is important that during pre-lab, students are encouraged to keep track of mass data for all the solids in the lab and not just the two metals; both of the reactants (copper and undissolved silver nitrate) and the metal product (silver.)


      This lab debrief can take a variety of directions, because so much precision is required in the technique of isolating the solid silver product, that uncertainty and lab technique could become a tangential focus of the discussion; however, it is important (as with any lab debrief) that the main focus is kept at the forefront of discussion. In this case, the main objective is to determine which reaction physically took place based on empirical evidence. Though uncertainty in measurement & calculation, as well as technique and sources of uncertainty are all points that should be considered in this lab debrief, don't allow them to become the main points. To initiate discussion, have all groups put their data into a single spreadsheet that can be displayed for the entire class to see at once. Have students report their molar ratios of copper:silver and silver nitrate:silver. Ask them to analyze the data for patterns and meaning, but to also consider what was physically happening in the reaction. Why didn't the reaction just continue making more silver; what made it stop? Focus again on the distinction between how many (mole ratios) and how much (mass ratios.) Keep students in perspective of the balanced reactions they wrote in pre-lab. It is the case that either of the following reactions took place, based on either the copper (i) or copper (ii) ion, respectively:

      Cu(s) + AgNO3(aq) = CuNO3(aq) + Ag(s)

      --OR-- 

      Cu(s) + 2AgNO3(aq) = Cu(NO3)2(aq) + 2Ag(s)
       
      Based on the data, they should be pointed to consider which reactant to base their calculations of predicted amount of product on. Though they might choose either reactant, which amount can they be certain of in their calculations? Do they know that their mass of copper is all the copper that reacted? How about the silver? The reactant to product ratios, which they saw in previous labs can help determine how much reactant was used up and which reaction took place, can help to resolve this issue. They will inevitably see that silver nitrate was mostly (if not completely) used up in the reaction because the mole ratio of silver nitrate to silver they measured is about 1:1; and according to either possible balanced equation for the reaction, the silver nitrate to silver ratio should be 1:1. That means a close to 1:1 ratio of silver nitrate to silver in the lab implies their amount has a good degree of certainty for basing calculations upon. Going forward, they can base their calculations on the silver nitrate used in the reaction to predict how much copper would have been used in the reaction and then compare that to the amount of copper used they actually measured. When they see this comes out fairly close, they can then use the copper to silver ratio to determine which reaction took place.

      Just like the discussion section of a traditional lab report, the post-lab discussion and debrief for this experiment is very meaty and should not be taken lightly. It is the chance to introduce the terminology limiting reactant, excess reactant, and percent yield in the context of the lab and their empirical data. Once they have a sense for the terms, and they've arrived at which reaction took place, they can calculate a percent yield for their experiment and discuss uncertainties in the lab. Once the lab objective has been achieved, students should conclude that it doesn't matter how much you use of the reactants, it will still proceed according to the balanced equation. This is the anchoring principle that they should have going forward into stoichiometry.

      Once we finished our lab debrief, we practiced whiteboard questioning with BCA table method of solving stoichiometry problems. Many of us have really gotten the hang of questioning and whiteboard sessions after 12 days, and so we were ready today for some advanced techniques. We practiced questioning correctly done boards and differentiating between silly mistakes (e.e., accidentally omitting a 2 subscript on hydrogen gas to make it diatomic in an equation when the student knows better) compared to errors of major conceptual understanding. We agreed that not all whiteboards are created equal, nor do they all have errors or the same type of errors. Thus, we need to be prepared for all the possibilities. 

      We also discussed including other students in the questioning process, even going to the length that the teacher can whiteboard a problem solution and present it to the class and students can question them. The most advanced technique anyone had ever tried was to play the Mistake Game (explained in detail by the amazing Kelly O'Shea) where students purposefully (or accidentally even) embed mistakes into their whiteboard solutions and other students have to try and elucidate their error during presentation through questioning and discussion. Several other advanced techniques for whiteboards in the classroom were discussed and considered, including some from a "whiteboard ninja" named Bowman Dickson.

      Definitely one of the most cerebral days in the workshop thus far. With unit summary boards, the introduction of stoichiometry, the BCA Table method, a limiting reactant lab done through inquiry, and advanced whiteboarding techniques, this was a modeling pentathlon for sure, but it was empowering and insightful nonetheless. Stoichiometry is one of the most nettlesome content topics to teach students and often becomes the make-it-or-break-it moment in many students' introductory chemistry experiences. Having a better way to teach stoichiometry is greatly encouraging!

      Two days left to go; home stretch, here we come!!


      Monday, July 30, 2012

      #ModChem Day 12

      Modeler's Log, Day 12--

      A major endeavor of the modeling methodology of science instruction is to address and correct student misconceptions about science ideas. On day 8, we read an extensive article by Vanessa Barker about the variety of misconceptions that students have about chemistry. We continued today in the direction of misconceptions but narrowing our focus to students' ideas about energy.

      William Galley's article "Exothermic Bond Breaking" chronicles persistent misconceptions of energetics by students in a variety of science classroom settings. Galley points to misrepresentation by science textbooks and ineffective instructional practices as being sources of the disinformation that "energy is released when chemical bonds are broken." This leads to what we fondly called the 'Pixie Stick Model' of energy, which many students are led to hold based on instruction in high school biology (and sometimes chemistry) courses. This misconceived understanding of energy views chemical bonds, such as those in the "high-energy phosphate bonds of ATP," like Pixie Sticks. When the Pixie Stick bond is "broken," the energy is "released" like the crystals inside of the Pixie Stick. It is misleading to students that bonds are talked about as physical objects that can "contain" energy, when it actually is the case that the bond is not a physical object but rather an interaction between electric fields, where the energy is really stored.

      We noted from the article that traditional language used to describe chemical bonds, especially the language associated with energy molecules in biology courses, can be attributed to this inaccurate view. We all agreed that we cannot use language that makes it seem like bonds "store energy" or that "energy is liberated upon cleaving the high-energy bonds of ATP" in biology courses, but also that we need to be cognizant of these preconceptions when students enter high school chemistry courses.

      Instead, we must do a better instructional job of helping students to realize that it takes energy to break bonds and can release energy when bonds are created. In the end, there really needs to be a comprehensive model that takes into account both bond making, bond breaking, and the net energy transfer after a chemical reaction is completed. Focusing on energy transfer in chemical reactions proves, according to Galley's article and the Modeling Instruction research, far more useful in communicating a coherent view of energy. Galley also promotes schematic diagrams to represent the energy transfer in systems, which he describes happens more frequently in college-level chemistry courses. Other recommendations from Galley include, teaching the difference in bond energy between substances more explicitly, as well as better communicating that the bond energy refers to energy required to break a bond. These changes can make clear that it takes energy to break bonds and releases energy to make bonds; therefore, it's the net energy that really determines the exothermic vs. endothermic descriptor of a chemical reaction.

      Following the conclusion of our article discussion, we practiced whiteboard questioning with balancing chemical equations and representing the balanced reactions with particle diagrams. There are several strategies out there to balance chemical equations, but often it is taught in a way that makes it seem like there are procedural rules that can be algorithmically followed--that isn't always the case. What is the case is that some methods of balancing chemical equations, especially those that do not include particle diagrams, can lead students away from having a concrete conception of what is physically happening in a reaction. All balancing strategies taught in modeling chemistry are accompanied by a particle diagram. This provides a visual basis for self-assessing the correctness of the balanced chemical equation.
      Since the modeling method stresses the importance of having a particle view of matter, the diagrams become imperative in balancing reactions. This also keeps students grounded in the model of chemical change that is 'rearrangement of atoms' and thus conservation of matter.

      Our questioning has improved, but one thing that we all noticed in each other was how much we gravitated toward positive feedback in playing the role of teacher questioning students. We all have been encouraged to maintain a good level of praise in the classroom, but it was noted that the object of the praise became unclear to students in some situations and could lead to a false sense of confidence in one's problem-solving strategy. In our debrief, this led to the question of praise in the classroom (2012) and its role in whiteboard questioning sessions. How/when to praise? An interesting technique called, "Right is Right," was brought up from Doug Lemov's Teach Like a Champion book. According to this technique, it is important to hold content/strategy praise until a right answer is presented. Attempting to praise an attempt or effort when a response is inaccurate can mislead students into believing their thinking is sound.

      The praise discussion poured over into a discussion of the classroom climate that would encourage risk-taking and a sense of security. We kept coming back to a notion we arrived at earlier in the course, 'modeling doesn't work if you don't build relationships.' This mantra is essential in making a successful modeling classroom and modeling instruction experience for students. There are many different strategies for building rapport in ones classroom, but everyone must do something that fits their personality and teaching style. Instruction must be personalized and the human element cannot be omitted if you want your class to be a success.


      Next up was a set of reaction lab stations, where students have the chance to observe many different types of reactions and determine the physical signs that a chemical reaction has taken place. By comparing and contrasting the different reaction types they observe, the lab stations can elucidate patterns in chemical reactions to students and give rise to a predictive model for determining products. This takes students into classifying and modeling with equations the different types of reactions.

      I recalled how I used to teach reaction types, as I was shown to do in my student teaching, which was to model the reaction equation templates as relationships between people. For example, my mentor teacher suggested that a double replacement reaction was just like the TV show Wife Swap. Instead of writing out AB + CD --> AD + BC, I used to draw out stick figure couples of husbands and wives, then show the swapped couples! Though it was laughable and memorable, it didn't really make clear anything chemical about the reactions for most students. When I discussed this former approach with my fellow workshop participants, we decided that was poor practice because it personified chemistry. Be careful with 'personifying elements' to students; though it might be memorable in a story-like way, it can tend to oversimplify, or even mislead students about, the concepts.
      I am still entertained, however, with this personification of elements and reactions by the Marie Curie Fellowship. Just for fun, here it is:


      Finally on the day, we took our balanced equations and looked for a way to represent energy in reactions. Based on our Galley article reading, and inspired by our previous treatment of energy from day 6, we chose to follow our established conventions in the LOL diagrams to represent chemical energy transfer. We brainstormed how we could characterize the difference between exothermic and endothermic reactions in sequence with our modeling curriculum, and we concluded that we could introduce endothermic v. exothermic v. activation energy based on energy transfers and overall net energy transfer during reactions. Chemical reactions trasnfer energy "internally" within the system, but can ultimately translate to a transfer of energy into/out of the system through heating. We agreed to describe endothermic reactions as products require more energy than reactants to maintain their particle arrangement and exothermic reactions as products require less energy than reactants to maintain their particle arrangement. This allows students to fit the terminology into their model of energy transfer.

      With this approach, it is important to focus on keeping separate the internal energy transfer between energy "accounts," how the system is defined, and how energy can be transferred into or out of the system from/to the surroundings. Depending on your course curriculum, we found this to be an appropriate place to introduce spontaneity in reactions and discuss when energy transfer occurs. During spontaneous processes, the energy transfer with the surroundings occurs after the reaction; however, during non-spontaneous processes, the energy transfer with the surroundings occurs before the reaction in order to make it happen. Including activation energy can be done here, but it should be incorporated in a manner consistent with the LOL diagrams model of energy transfer; otherwise, it can be held off until a study of reaction kinetics.

      The modeling approach to representing energy transfer is inspired by the work of Gregg Swackhamer, but is presented in an insightful manner by Larry Dukerich, here in this approach to representing energy transfer with chemical reactions: